Every prepper and homesteader needs to know how to make pepper jelly, right? Because let’s be honest—if you’re planning to survive the Rapture on canned green beans, you might want to start stocking up on actual flavor first. Nothing says “end of days” like a life spent dreaming of spicy jelly while everyone else is living off flavorless apocalypse rations. Earlier in the week The TikTok told me that the Rapture may or may not be happening, but yet, here I am, still hiking and taking photos with my dog and of course, dreaming about what spicy foods to indulge in for lunch.
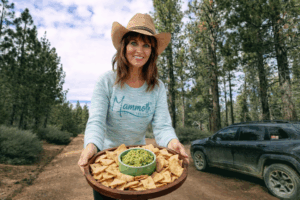
I feel like every mountain gardener extraordinaire in this small town may not have any lettuce this summer as the ground squirrels think my front yard is Souplantation, circa 2015. However, at least we have a shit ton of peaches and plums this late August. Please don’t get me started on the apples. I have started becoming friends with horse people just to give my organic Jona Gold apples away. (Just kidding, I’m actually already friends with so many awesome horse people)
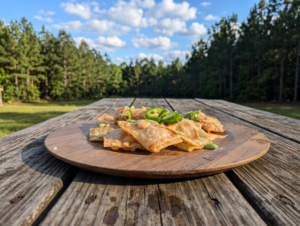
We have so much organic homegrown fruit here in our garden at almost 7,000 feet in Big Bear Lake, California; however, I’m just not a fan of regular jam and jellies. It’s just too much sugar for me. However, I love me some spicy pepper jelly with a vengeance. Maybe that is because, smear some goat cheese in Mango Habanero Pepper Jelly and you basically have the best easy appetizer ever created. My problem with store-bought pepper jelly from Trader Joe’s is that it’s all sugar, no fruit and no spice. Obviously, I had to learn to make it myself!
If it’s September here in Big Bear Lake, California, then we definitely have a plethora of peaches on our trees. Even the dessert lover in me cannot eat that much peach cobbler. As much as I love Peach Caprice Salad, sometimes I just need to find something else to do with all those peaches.
So welcome, brave canners and flavor enthusiasts! Today, we’re diving into the wild, fiery world of homemade pepper jelly. Yes, it’s as delicious as it sounds—and as dangerous as a toddler armed with a pink glitter pen. But before you get your jam on, let’s talk about some crucial tips to keep your eyes, your sanity, and your taste buds intact.
First up: de-seeding those peppers. You might be tempted to go full-on pepper masochist and leave every fiery seed in place. Don’t do that. De-seeding those habaneros (or whatever devilish pepper you’ve chosen) lets you enjoy all that smoky, spicy flavor without sobbing like you are thinking about what Gavin Newsom has done to California.
Next: always, always wear plastic gloves. I cannot stress this enough. Touch those peppers, and your fingers will be hotter than a August at Burning Man (Without the LSD) More importantly, if you a ccidentally rub your eye or scratch your nose—hello, fiery inferno!—and suddenly you’re staring at your reflection with eyes that look like you used bear spray. Gloves are cheap insurance against a spicy catastrophe.
Now, a brief history lesson, because who doesn’t love a little pepper trivia? Pepper jelly actually dates back to the 18th century. It’s a fusion of Native American and European culinary traditions—a sweet and spicy condiment that was originally used as a preservative before the advent of refrigeration.
So what makes a good pepper jelly? Typically, you’ll find peppers like jalapeños, habaneros, or even bells paired with fruits like apples, peaches, or even pineapple. The fruity sweetness balances out the heat, creating that perfect yin-yang of flavor. Because let’s face it: life’s too short to eat hot stuff that just burns—you want that sweet, spicy, kissed-by-magic flavor. Once Martha Stewart broke out of a West Virginia Federal Prison, it eventually became every Southern California housewife’s favorite charcuterie complement.
Pectin fiber goodness

Pectin is basically a fruit’s way of saying, “Hey, I’ve got a little fibrous magic to turn your runny mess into glorious peach-flavored gel.” It’s a natural carbohydrate found in fruits like apples and citrus, and it’s what gives your homemade pepper jelly that perfect, jiggle-worthy consistency. Is it healthy? Well, think of pectin as fruit’s humble cheerleader—soluble fiber that can help lower cholesterol and keep your digestion running smoother than your last Tinder date. No, it’s not a miracle cure or a substitute for kale, but if you’re going to fuel your condiment obsession, at least do it with the fruit’s own gel-loving sidekick. So go ahead, embrace the pectin—your jelly and your digestive system will thank you. I mean, who doesn’t want to embrace more fiber in their diet?
When heated with sugar and acid, pectin turns your soupy apple concoction into actual jelly. You can find it in the baking aisle of most big box grocers in powdered or liquid form. Tip: Make sure your pectin is not expired.
My two favorite homemade pepper jelly flavors are either Plum, Ginger and Shishito or this tasty
Peach, Ginger Habanero Jam

2 Habaneros, deseeded
1 quarter-sized chunk of fresh ginger, skinned
2 cups of peaches, cut into small bite-sized chunks, pit removed
2 cups of sugar
1/4 cup of apple cider vinegar
1 small box of powdered pectin
Step 1 ( And this is when you want to put the gloves on)
First things first: Wash those peppers like they’ve been rolling around on the floor of a dive bar. Dry them off, then perform some pepper surgery—stems, seeds, and ribs must go. Toss the peppers into your food processor along with that skinned ginger. Pulse until it’s chopped, but for the love of Martha Stewart, don’t overdo it—you want a jelly, not a sad baby food puree.
Step 2: Combine Ingredients in a Pot
Now we’re cooking. Literally. Grab your big, heavy-bottomed pot (because flimsy cookware is for people who think microwaving ramen counts as “making dinner”). Into the pot go your peppers, peaches, vinegar, and sugar. Stir it like you’re auditioning for a witch in a Shakespeare play, ( Feel free to cackle) then crank the heat until it’s at a full rolling boil. Let it boil for 1–2 minutes while you stir like your life depends on it.
Step 3: Add Pectin
Time for the magic glue of the jelly world: pectin. Stir it in, keep boiling for one dramatic, action-packed minute, then remove it from the heat. You’ll probably have some foam floating on top—skim it off unless you enjoy your jelly looking like it has a bad bubble bath hangover.
Step 4: Ladle Into Jars
Here’s where we get serious. Pour that molten-hot pepper lava into sterilized jars, leaving about ¼ inch of space at the top (aka “headspace,” which sounds like a 2000s alt-rock band). Wipe the rims clean—no one likes sticky jar edges—then pop the lids on and twist until fingertip tight. Not Incredible Hulk tight. Just fingertip tight.
Step 5: Process the Jars
Finally, the finishing move and just in time for happy hour: process your jars in a boiling water bath for 10 minutes. (Start your timer after the water comes back to a boil, otherwise you’ll be waiting forever wondering why your jelly isn’t jelly-ing.) When time’s up, lift those jars out like the domestic champion you are and set them down. Do not poke, prod, or “just check” them for 12–24 hours. Leave them alone, and tomorrow you’ll wake up with the most beautiful, spicy-sweet pepper jelly that will impress your friends and make you feel like a pioneer woman without needing to churn butter.
Congrats, you just made Pepper Jelly!
Homemade Pepper Jelly & Canning FAQ
How do you safely handle hot peppers when making homemade pepper jelly?
Handling fiery hot peppers like habaneros requires a strict safety protocol if you want to avoid a spicy catastrophe. Always wear plastic or disposable gloves before you begin cutting. If you touch bare skin after handling chopped peppers, the lingering oils will cause a massive burning sensation—especially if you scratch your nose or rub your eyes. Additionally, take the time to perform pepper surgery by removing the stems, seeds, and ribs; this ensures you get a beautifully balanced, sweet-and-smoky heat without sobbing over a blinding inferno.
What is pectin and why is it necessary for making jelly?
Pectin is essentially a fruit’s natural way of turning a runny, soupy liquid into a glorious, jiggle-worthy gel consistency. Found naturally as a soluble fiber in fruits like apples and citrus, pectin undergoes a chemical reaction when boiled alongside sugar and acid (like apple cider vinegar). This creates the structural bind required for jam and jelly. It also acts as a digestively friendly fiber kick! Pro tip: Always check the box in your baking aisle to make sure your pectin isn’t expired, or your jelly won’t set up properly.
How long do you boil pepper jelly once the pectin is added?
Timing is absolutely critical in the jelly world. After combining your fruit, sugar, and vinegar in a heavy-bottomed pot and bringing it to an initial rolling boil for 1–2 minutes, you stir in the pectin. Once the pectin is fully integrated, keep the pot over high heat and stir continuously at a hard rolling boil for exactly one dramatic, action-packed minute. Remove it from the heat immediately after the minute ends and skim any lingering foam off the top so your finished jars look crystal-clear.
How much headspace should be left at the top of the jelly jars before canning?
When ladling your molten-hot pepper lava into sterilized mason jars, always leave exactly 1/4 inch of headspace at the top. Leaving this precise gap ensures that a perfect vacuum seal can form as the jars cool down. After filling, use a clean cloth to wipe the rims completely free of sticky residue, pop the lids on, and twist the bands until they are snug—aim for fingertip tight rather than tightening with extreme brute force.
How long do you process pepper jelly jars in a water bath canner?
To make your pepper jelly shelf-stable for your long-term pantry storage, process the sealed jars in a boiling water bath for 10 minutes. Crucial note: Do not start your kitchen timer until the water has returned to a full, active rolling boil after submerging the jars. Once the processing time finishes, lift the jars out like a domestic champion and let them sit completely undisturbed on a towel for 12 to 24 hours. Avoid poking, tapping, or moving them so the pectin fiber can work its magic and set up perfectly.